
- Home
- Premium Memberships
- Lottery Results
- Forums
- Predictions
- Lottery Post Videos
- News
- Search Drawings
- Search Lottery Post
- Lottery Systems
- Lottery Charts
- Lottery Wheels
- Worldwide Jackpots
- Quick Picks
- On This Day in History
- Blogs
- Online Games
- Premium Features
- Contact Us
- Whitelist Lottery Post
- Rules
- Lottery Book Store
- Lottery Post Gift Shop


The time is now 12:58 pm
You last visited
July 20, 2026, 9:34 pm
All times shown are
Eastern Time (GMT-5:00)

Very Basic Photo Tutorial.
Published:
As I have not taken photos for so very many years I have forgotten how to take them, so here we are going to re-learn:
-------

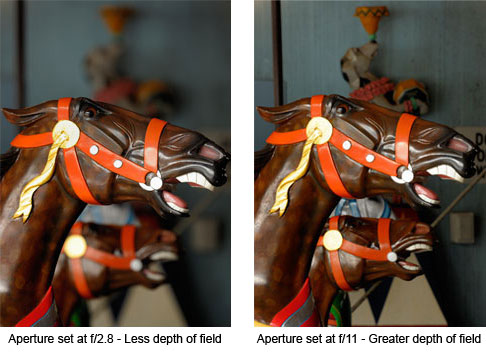
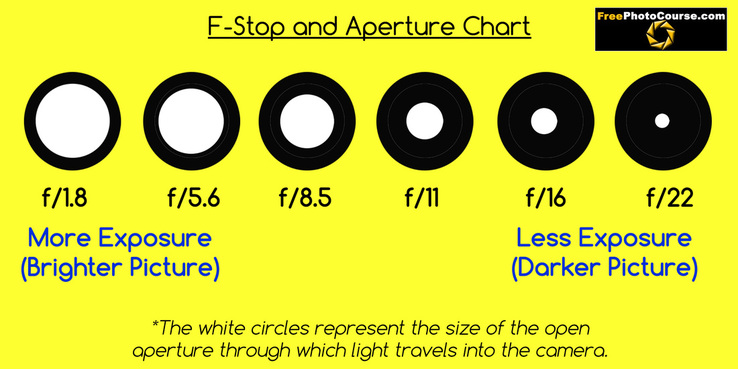
The aperture controls the depth-of-field.
Depth-of-field is how much of the picture is sharp, and how much is blurry.
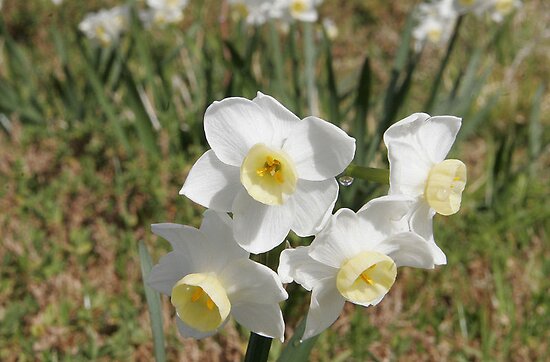
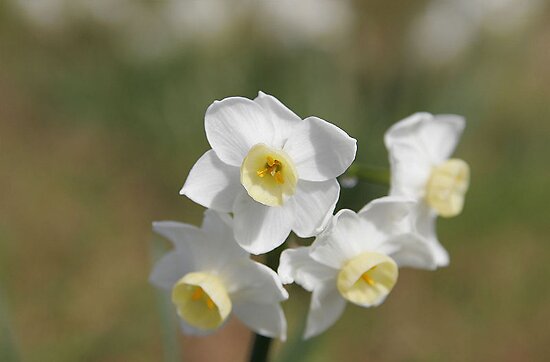
What you will see is at F/1.4 the background is totally blown out and your focus is very narrow or shallow. As I change the F Stops and go up in numbers you
will see how the background starts to come out and become more clear.
If you want to take a picture of a sweeping mountain vista, you’d want to use a small aperture size (high f-stop number) so that the entire scene is in sharp
focus.
SHORT Depth of Field refers to a narrow field of view that is in focus. When objects in the foreground, mid-ground OR background are exclusively in focus,
this is referred to as short depth of field. This is most often used in portraiture, in which the photographer wishes to focus attention on the portait
subject by showing landscapes, buildings and/or other objects in the background as a blur.
LONG Depth of Field, by contrast, refers to a wide field of view that is in focus. With long depth of field, objects are in focus both the foreground and
mid-ground, or in the mid-ground as well as background, or even from the foreground all the way through to the background...all are in focus!
HOW TO GET SHORT DEPTH OF FIELD:
1. Position your subject away from any background walls; You must show depth in the background to see any
depth of field effect.
2. Aperture Priority - Choose the lowest f-stop available on your lens. You want to shoot with a wide aperture.
3. Get close to your subject. The closer you are to your subject, the shorter the depth of field. (ie. macro
shots almost always have extremely short depth of field)
4. Use a little zoom. Zooming to about 80-130mm on a DSLR camera will provide an increased short DoF
effect.
5. Focus on your subject and snap the shutter!
HOW TO GET LONG DEPTH OF FIELD:
1. Just as with short DoF, position your subject away from any background walls; You must show depth in the
background to see any depth of field effect.
2. Aperture Priority - Choose the highest f-stop that your lighting will allow. F-stops at 16 and 22 will give you
the best results. Remember, narrow apertures result in longer-distance focus.
3. The farther your subject is from the lens, the longer the depth of field will be. If you must get a close-up,
move your subject to a point at least 1 yard (1 meter) from the lens.
4. Do NOT use ZOOM or a telephoto lens! Widen your zoom as far as it will go. If you have a non-zoom wide
angle lens, this will deepen the long DoF.
5. Focus on your subject and press the shutter!
---------
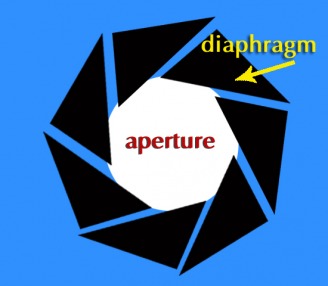
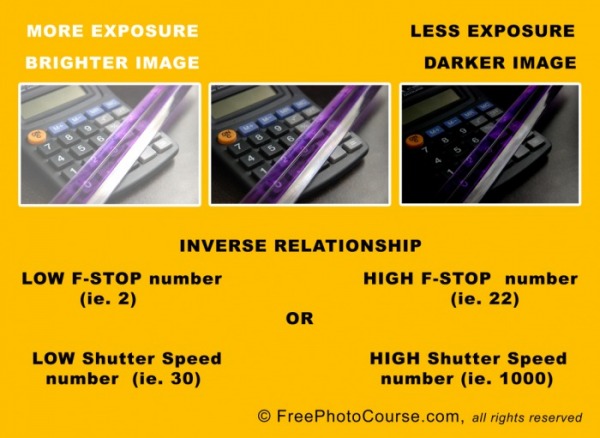
So suppose you take a picture that is too bright. How do you fix it? Simply choose a smaller aperture. Simple! Aperture sizes are measured by f-stops. A
high f-stop like f-22 means that the aperture hole is quite small, and a low f-stop like f/3.5 means that the aperture is wide open.
------------
HIGHER F-STOP NUMBER = LESS LIGHT ENTERS CAMERA
HIGHER SHUTTER SPEED NUMBER = LESS LIGHT ENTERS CAMERA
LOWER F-STOP NUMBER = MORE LIGHT ENTERS CAMERA
LOWER SHUTTER SPEED NUMBER = MORE LIGHT ENTERS CAMERA
-----------------------------
Factors That Influence Exposure
AMOUNT OF LIGHT
ISO (variable light sensitivity of the CCD or CMOS chip)
SHUTTER SPEED
F-STOP (resulting in a specific aperture size)
----------------
The shutter is a small “curtain” in the camera that quickly rolls over the image sensor (the digital version of film) and allows light to shine onto the
imaging sensor for a fraction of a second.
The longer the shutter allows light to shine onto the image sensor, the brighter the picture since more light is gathered.
A darker picture is produced when the shutter moves very quickly and only allows light to touch the imaging sensor for a tiny fraction of a second.
The duration that the shutter allows light onto the image sensor is called the shutter speed, and is measured in fractions of a second.
So a shuttedr speed of 1/2 of a second will allow more light to touch the image sensor and will produce a brighter picture than a shutter speed of 1/200 of a
second.
So if you’re taking a picture an it is too dark, you could use a slower shutter speed to allow the camera to gather more light.
-------------------
A high ISO such as ISO 1,600 will produce a brighter picture than a lower ISO such as ISO 100. The drawback to increasing the ISO is that it makes the
picture noisier. Digital noise is apparent when a photo looks grainy.
--------
When you shoot aperture priority mode, you set the aperture (the f-stop) and also the ISO.
The camera will then set a shutter speed for you so that the picture is properly exposed.
----------
If you’re usually shooting your portraits at f/2.8 or a similar low aperture. Suppose, also, that you’re using a 100mm lens and standing 7 feet (2.1 meters)
from the subject. Did you know that, with these settings, that only 1.4 inches (3.5 centimeters) of the photo is sharp? That means that, if you focus on
the person’s cheek, their eyes and nose will be partially blurry.
So if you want your photos to come out crystal clear and sharp, you need to focus PRECISELY, and make sure you have enough depth-of-field to make the subject come out sharp.
When shooting portraits, you will almost always focus on the person’s eye.

---------------
Very basic as I said.
Finito!
Comments
This Blog entry currently has no comments.
Post a Comment
Please Log In
To use this feature you must be logged into your Lottery Post account.
Not a member yet?
If you don't yet have a Lottery Post account, it's simple and free to create one! Just tap the Register button and after a quick process you'll be part of our lottery community.
Register